We need to talk about... D365 Marketing... Email Designer
- Graeme Donnell

- Jul 5, 2022
- 5 min read
Updated: Jul 14, 2022
Next in my blog series on D365 Marketing, I take a look at the Email Designer component which gives users the ability to manipulate images and videos, take advantage of a ever growing list of fonts, preview all content across a range of device renderings and perform quick test send and validate the content in real time.
Email Designer in Dynamics 365 Marketing
Toolbox
One of the first thing you will notice is a simplified and more intuitive toolbox. The concept of building emails is the same – you drag tiles from the toolbox on to the canvas. Emails are now based on a table layout. If you drag a tile on to the canvas without sections the editor will automatically add one for you.
Basic Layout
Whether you choose to use an out of the box template to design your email or simply start from scratch the main building blocks are the same. Initially you want to have an idea of the end goal, what will my email template look like. Sketching this out on a peice page helps you achieve that goal.
It goes without saying each email such consist of a header element, i.e. an image, a body element, i.e text paragraphs combined with images, logos, videos etc and then a footer section which generally contains social media links, company info and the all important unsubscribe links. The headers and footers are relatively fixed but within the body we need to decide on a single column design or multi column design.

These are the traditional design available out of the box and your choice is dictated by the content you want to display and is very much a trial and error process initially.

For the purpose of this blog I am going to build content using a selection of layout styles and in terms of adding content to the email design, it is a simple matter of dragging and dropping the relevant element from the toolbox on the right, onto the email design in the middle.
Now for the actual content we can incorporate into our email design. First up............Text!
Text

Having created the text we also notice the simplified way of setting inner spacing – we can set equal for all sides with one click (used to take eight clicks at least)

We can do a simple customisations to a text field, such as sizing and default font selection. But if we are using the text field to map values in for some level of personalisation. We can achieve this via the "Personalisation" option from the embedded ribbon.

From here we can link out to the contact entity for example, and pull in the Full Name. Particularly useful for templates that we may use as part of a personalised journey or event welcome email.
Images
In order to add an image we first the location and storage options for any imagery, logos, branding etc. Within D365 Marketing you have the ability to build a repository of images called a library and from this library you can manage the contents and easily pull them into your templates.

Once inserted, you can make additional changes using the pane on the right hand side. These include, creating a link from the image, rounding the corners, selecting the width to name but a few of the features

Button
Some elements have actually been moved and consolidated under the Button menu. So when we design and add our button we can pull in or link out to element such as Marketing Pages, Survey, Event, and Teams check-in.
In the below example, I have created a button, resized and styled it and added a simple URL to my D365Ni blog.

But in the "Link To" dropdown I could select additional options highlighted above,

Videos
A relatively new element is the ability to pull video and more importantly embedded video in your email content.
Much like the other elements, we simply drag and drop the video element onto the email, select the source and then create an image to act as the thumbnail. If we don't select an image for the thumbnail, it looks messy and isn't initially clear that the video even exists in your content.
Other settings are pretty standard, we can resize, round the corners, reposition and so on.

QR Codes
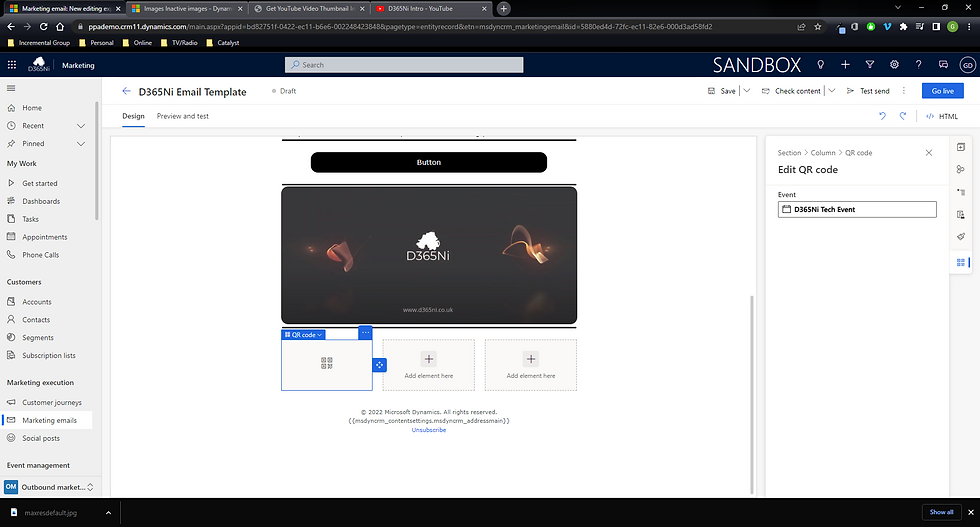
If we want to include a QR Code in our email, lets say for an event invite or to link people out to a specific webpage on our site, we can easily do this by pulling the QR code element onto the designer

From here we can link this directly back to an event using the pane on the right hand side. There are no additional configuration changes we can make for this element
Code
The last element I want to cover is the Code element. This is a really a way of bringing in any additional element that isn't covered easily with the elements we have discussed so far. Personally I haven't come across a customer need for this, but lets say you have a piece of dynamic content, a registration form which works way but is hosted or managed into another tool. Sourcing the code for this will allow you to embed that element in your design with ease.
Previewing
At this point we have built the initial building blocks of our email. We have included some imagery, some text, a embedded video and a custom button out to our website.
To preview an email navigate to the Preview and test tab and this tab has been redesigned to offer you a preview of Screen sizes as well as Email clients (generated by Litmus)

Test Send
In order to be fully confident that your email looks good and is formatted correctly you can also utilise the Test Send function. This allows for a copy of the email to be sent a mail address of your choosing to get a true end user experience of the email.

Last Minute Admin
As a mop up activity on this post and before you actually publish your email for use in customer journeys or as part of a email campaign of any kind, you need to ensure you have set a number of key elements
Subject - Each email template requires a Subject line
PreHeader - Additional details about the email
From Name - The name which will appears in the recipient inbox
Reply to Address - the addresses that replies to your email will go to

Once these are in place, you can now publish your email and use it within customer journeys or any other aspect of your Marketing tasks.
There are lot of other hidden gems in the new editor which I couldn't cover today, to name but a few, the ability to clone a section, ability to save all custom emails as templates, and loads of different formatting options around fonts, style, widths and heights, plus much much more. Overall I am really impressed with the new look and found it as a user very fast and intuitive and an impressive tool to demo to customers as well.
Hope you all enjoyed this post on the Release Wave 2 plans for 2021 for D365 for Sales. I will continue this series with some additional content specifically related to Marketing and Customer Service. Take Care, Speak Soon!


Comments